

Dary
-
Število vsebin
210 -
Pridružen
-
Pretekli obisk
Zapisi od Dary
-
-
pri tej sliki gre povezava preko dveh omrežnih kartic.....ve kdo kako usposobim UPnP v visti?
-
Ali mora biti taka povezava ali pa imam lahko PC ter xbox priključen na modem posebej?

-
Poskušam povezat xbox 360 z mojim računalnikom in mi enostavno ne uspe.
Uporabljam Win. Vista ultimate x86 ter xbox 360 z novim dasshboardom NXE.
Imam tudi modem od SiOL-a Sinope 568+ ter ga imam narejenega kot ruter.
Zdaj pa prosim če mi kateri pove postopek od začetka do konca kaj vse moram narediti.
Zdaj nevem kako naj dodam xbox v domačo omrežje da bi ga potem media center našel...
prosim za pomoč
lp
-
Moj brat se je odločil, da bo naredil xbox live gamertag. Z bratom sva naredila na xbox strani live profil, vpisala neko poštno kodo in ulico, ki sva jo našla na netu. Nato sva šla na njegov stari profil in izbrala JOIN XBOX LIVE. Vse gre lepo in prav, potem vpraša, če lahko ta stari profil recovera s ta novim. Izbereva yes, potem pa se prikaže okence v katerem piše "Xbox live-not supported in this locale". Vse sva dobro naredila in še vedno to sranje piše. :annoyed:
Pomagajte, ker bo brat dobil popizditis.
-
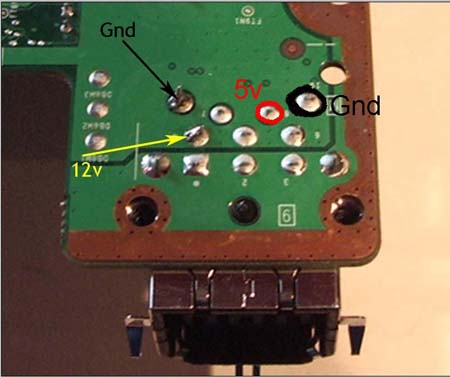
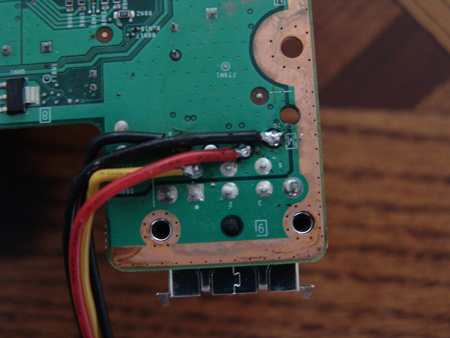
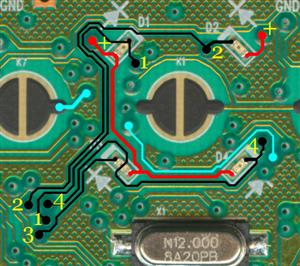
Dodajanje Molex priključka za Xbox 360:
Super zadeva npr. za dodajanje ventilatorjev ter neonk itd...
Priporočana orodja:
1. Spajkalnik in spajkalna žica
2. Molex priključek
Open the 360, then take the motherboard apart. Take out every screw on the bottom of the 360 cage. Pull out the motherboard and flip it so you can see the bottom side of the psu conneter.
Yellow on a molex is 12v, red is 5v, and the blacks are grounds. Tin the wire (add a little solder to them), and tin the connetors as well. Solder them sideways so that when you run the molex up and around the motherboard your solder joints dont flex and break. Plus makes it easier to get it past the fan.
Basicly use the photo for the 12v, 5v, and grounds.
-
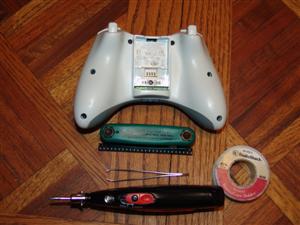
Menjava LED-ic na kontrolerju (Testirano deluje):
Če kdo ne razume naj uporabi google translate!
Supplies/Tools needed:
1. Phillips head screwdriver for wired controller.
- Security Torc T9 driver for wireless controller.
2. 0603 leds I recommend buying them from http://www.unique-leds.com"
They range from 24 cents to mid 30 cent range. Far cheaper then mod sites.
3. Soldering Iron + Solder.
4. A pair of tweezers. Optional, for getting the lcd into position for tacking.
Here is a picture of a single lcd. Notice these are
extremely small, and this mod is not for the faint of
heart, but hey your reading my tutorial no worries.
Now you will need to remove all the screws. There will be a hidden screw underneath the serial number. Its in the middle, feel around and you will locate it.
Once you have done this peel that controller apart and set the pcb down. Now look at the middle of the pcb, (green card, with lots of stuff on it) you will notice the small lights, there are four of them.
I will describe the process of floating these leds off and put up the link to a site that shows how its done in a nice neat little video. I tried to create my own, but was to difficult to do by myself.
First heat up the soldering iron, grab your solder, and place a little down on both sides of the led, now heat it up as fast as you can and push the led to the side with the iron when the solder is heated and it will peel off. This takes a little bit of effort, but after you complete one the rest will fall in short order.
Note full credit goes to our network affiliate llamma for this great video.
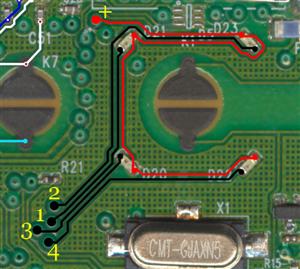
Now these next two photos, that show the polarity of the boards was taken by RDC at http://forums.xbox-scene.com
Wireless controller polarity
Wired controller polarity
The reason behind these pictures, is the fact that if you follow the other tutorials on the web, they are very confusing and half the time, don't offer a picture showing the polarity. With these its very easy, black is negative, and red is positive.
If you look on the bottom of your lcds, you will see either this -| or a triangle. Now the -| the line points towards negative, while the triangle's point is pointing towards negative. This is how you use the pictures in conjunction with the negative to lay down your lcd's.
I will be honest, I am really rusty with soldering. I've been soldering for years, but even the first laydown of an lcd gave me a bit of a problem. Here is a tip, lay out the lcd on top of the solder points. If a piece of the solder point is sticking up making it a bit difficult to lay down the lcd, go ahead and touch it with the soldering iron. Do this a few times and the solder will round out making this part of the installation process that much more easier.
Now that you have your first lcd ready to go, take your tweazers and push down firmly on the lcd. Take the soldering iron and touch either side of the lcd. This will solder the contact of the lcd to the solder.
Now after doing each one, you will want to check to ensure each lcd works. If you have a wired controller, plug it in and take the backing off the button's that contact the YXAB button's and lay it down. You will see two slots for the bottom lcds, thats the easiest way to tell if you are setting it down right, now press the the button in the center of the lcd's, and if your light glows up you know you have a good conection.
If you have a wireless controller, put the back plate back on and put the battery pack in, and do the same steps as you did above. If the lcd lights up great, if not, try adding a bit of solder to each of the joints, not to much. If still it does not light up, take off the lcd and start the process over.
Now do this for the rest of the lcd's, close the case up. Thats it, once you do a few controllers you will be so proficent at this, that you will not look at this tutorial, except for the polarity pictures.
Tips and tricks
1. Have a clean area with enough light to see what your doing.
2. Do not rush, take your time and ensure you do it right the first time.
3. When ordering the lcd's ensure you prepare for the worst, and snag a few extra.
4. If at any time you have problems, or questions, stop what your doing and hit the forums, or pm me, im on HQ quite a bit. Odds are you will catch me.
If you find this tutorial helpful, hit up the forums, and let me know.
-
Zanimame če lahko na ta disk tudi nalagaš igre ali je to samo za slike ter posnetke itd....
-
Uspešno odstranjen 20GB hdd in vstavljen nov 120GB disk....prišparal kar dosti €.... Če se sprašujete nekateri kako mi je uspelo malce poglejte po youtubu kako se menjava hdd.... Sicer pa komaj čakam drug teden ko grem po ta nov elite
-
Xbox 360
:thumbup: Gameboy Advance (na pol je fuč, neki ekran jebe, pač starost)
-
Pri zemljevidu rounabout ali kaj je že, je en tak beden glitch. Tam kjer je vse polno prevrnjenih vagonov, folk nekako pade pod tla zemljevida (namerno) in potem kolje sovražnike nad njimi ne, da bi jih tisti vidli. Upam, da bodo ta glitch popravili, kajti ta roundabout se mi je čisto zagravžal.
-
Imam eno vprašanje.
Kako je to mogoče shoelace, da igraš piratske igre na xbox livu in te ne banajo.
-
Danes je dan za tisti achievment, ko moraš doseči 7EXP v enem dnevu?
-
Jaz bi tudi prešpilal co-op kampanjo na legendary, čas pa bom mel tam v oktoberskih počitnicah.
-
Nazadnje sem igral BF: Bad Company. ql igra.
-
Zanima me če lahko na trenutni disk v xbox-u priklopim naprimer 500GB disk? Obstoječi disk ima tako ali tako sata priklop tako da mislimd a bi to delovalo. ali?
lp
-
ja zadaj ima vrsto priključkov med katerimi je tudi stereo izhod, scart kabel imam povezan na vhod dvd predvajalnika preko katerega se potem sliši zvok iz tv, zdej me pa zanima kako deluje ta 5.1 stereo iz xboxa?
-
Zanima me nekaj glede 5.1 zvoka ki ga ponuja xbox v meniju.
uporabljam samsung LCD TV in iz njega imam povezan zvok na hišni kino z 5.1 zvočniki zdaj me pa zanima če sploh deluje xbox v tem sistemu saj se vedno le slišita dva zvočnika in basi ko igram igre...
ve kdo kaj o tem?
lp
-
ja toti drugi xbox sem kupil za 30€ ker je imel RROD in sem ga pošlihtal in sedaj deluje brez problema, vsaj do zdaj..
zdej pa zgleda nekako takole:
-
zakaj bi me
-
Jaz sem tudi od njega kupi ta xbox livel, varno je. Cena pa je res neverjetna.
-
bog moj dragi
ne na onem igram fleshane igre, zadovoljni :razzy: -
Eno vprasanje...zakaj je dobro imeti dva xBoxa?
om zdej nvm če lahko to tu omenim....na tistem ki leži igram orginal igre preko live, na onega spodaj pa lahko ugotoviš katere igram
-
nekako tako izgleda to pri meni...
kmalu pride kotna omara pa bo potem vse ql izgledalo
-
ahah, ta pa je huda.
Všeč mi je, da je špil bolj krvav od onega Crysisa


[Uradna tema] Halo wars
in XBOX 360
Zapisano
Halo Wars me je kar prijetno presenetil. Je res, da ni dosti enot na voljo, je pa ogromno upgradeov na voljo. Pa vsak commander bo imel svoje posebne moči, upgrade in enote.